Dotwork Tattoo Designs — Stipple, Shade, and Sacred Pattern

Dotwork tattoo designs build form, texture, and shading entirely through thousands of precisely placed individual dots, creating an effect that references pointillist painting, copper engraving, and Buddhist sand mandalas simultaneously. Unlike conventional tattooing that uses line and fill passes, dotwork artists work dot by dot — density creates darkness, spacing creates lightness, and the transitions between are controlled entirely by dot placement rhythm. The result is a distinctive visual texture that reads differently from every distance: up close, the individual points are visible; from arm's length, they merge into smooth tonal gradations. Dotwork excels at geometric mandalas, botanical illustrations, animal portraits with textural fur or feather detail, and sacred geometry compositions. The technique demands extraordinary patience from both artist and client — a medium-sized dotwork mandala may involve hundreds of thousands of dots over multiple hours. It is also well suited to fine-line geometric work where dots replace continuous lines. Explore dotwork compositions with the MyInk AI generator before committing to the slow, meditative tattooing process.

Generate a Dotwork Tattoo

Recent Dotwork Inspiration

Browse designs in this style, then jump into the generator when you are ready.

View All Inspiration

History and Origins of Dotwork Tattooing

Dotwork tattooing draws from multiple art historical traditions and has deep roots in both Western printmaking and Eastern meditative practice.

Roots in Pointillist Painting and Engraving

The visual language of dotwork tattooing connects directly to pointillist painting (Seurat, Signac) and the stipple engraving tradition used in printing from the 17th century onward. Both techniques construct images from individual marks rather than continuous lines or fills. Tattoo artists with fine-art training recognized these parallels and began applying stipple technique to skin in the early 2000s.

Sacred Geometry and the Mandala Connection

Mandala-based geometric tattooing found dotwork to be a natural technical partner — the gradual, patient process of dot placement mirrors the meditative creation of Tibetan sand mandalas, and the resulting texture has a warmth and depth that flat fill or linework cannot replicate. Artists like Nissaco and Thomas Hooper became internationally known for geometric dotwork mandala compositions.

Hand-Poke Dotwork and the Machine Debate

Many dotwork artists prefer hand-poke technique — applying dots individually with a non-motorized handle — arguing it produces greater control and a softer aesthetic result than machine work. Machine dotwork is faster and more consistent at scale, making it the practical choice for large compositions. Both methods are represented among celebrated contemporary dotwork artists.

Contemporary Expansion of the Style

Contemporary dotwork has expanded beyond its mandala and geometric origins into portrait work, botanical illustration, animal studies, and abstract composition. The technique is now used alongside other styles — dotwork shading within geometric tattoos, stipple texture in illustrative work — as a complement rather than always a standalone aesthetic.

Key Characteristics and Popular Dotwork Designs

Dotwork's distinctive visual quality separates it from all other tattoo techniques. Understanding how it works helps you design effectively for this medium.

Gradient and Tonal Density Control

The central skill in dotwork tattooing is controlling tonal gradients through dot density — tight clusters create shadows, wider spacing creates highlights, and smooth transitions between densities create the illusion of three-dimensional form. A skilled dotwork artist can render the full tonal range from near-black to skin tone using only spacing variation in a single black ink.

Geometric Mandala Dotwork

Mandala compositions using dotwork shading are the style's signature achievement. The geometric precision of mandala construction combined with the organic texture of dot shading creates compositions that feel both engineered and handmade. Dotwork mandalas scale well from small shoulder or knee caps to large back centerpieces.

Botanical and Animal Dotwork Illustration

Flowers, insects, and animals rendered in pure dotwork take on a quality resembling antique scientific illustration or woodblock printing. The stipple texture suggests both the texture of petals, fur, and feathers and the age and authority of natural history museum prints. These subjects are among the most artistically demanding dotwork applications.

Geometric Linework with Dot Accents

Many artists combine crisp geometric linework with dotwork fill or shading inside shapes, creating compositions that benefit from both the precision of lines and the warmth of dot texture. This hybrid approach is particularly popular for geometric animal tattoos, where the structure is defined by lines but interior detail is built in dots.

Best Placements and Sizing for Dotwork Tattoos

Dotwork's patient, meditative creation process rewards careful placement planning — getting the canvas right makes an enormous difference in the final result.

Round Surfaces: Shoulder, Knee, and Elbow

Circular mandala dotwork compositions suit the naturally round surfaces of the shoulder cap, knee, and elbow. These placements create a three-dimensional effect as the circular design wraps around a rounded form. The shoulder cap is the most popular mandala placement because it presents consistently regardless of arm position and heals reliably on its relatively non-mobile surface.

Upper Back for Large Mandala Centerpieces

A large dotwork mandala as an upper back centerpiece is one of the most requested and impactful dotwork compositions. The flat, wide surface allows full circular development of the design and provides enough space for detailed dot shading that defines the mandala's dimensionality. Healing a large back piece requires careful attention to aftercare.

Forearm and Sleeve Integration

Dotwork shading integrates naturally into geometric sleeve compositions, providing texture and tonal variation between graphic line sections. A sleeve combining geometric linework, dotwork-shaded sections, and negative space can be built modularly over multiple sessions as the overall composition evolves. The forearm section typically reads best in terms of visibility and legibility.

Small Dotwork Pieces for Subtle Placement

Dotwork scales down well to small formats — a tiny dotwork moth, flower, or geometric symbol on the wrist or behind the ear can be exquisitely detailed at a few centimeters. Small dotwork pieces require an artist with excellent control at fine scales, as dots that are too large or uneven are more apparent in a small composition with limited elements to draw attention.

Frequently Asked Questions

How long does a dotwork tattoo take compared to line-and-fill work?
Dotwork typically takes longer than equivalent line-and-fill work because creating smooth gradients through individual dot placement is inherently slower than fill passes with a shader needle. A medium-sized dotwork mandala may take four to eight hours; large back pieces can require fifteen or more hours across multiple sessions.
Do dotwork tattoos fade or blur over time?
Dotwork tattoos can appear to soften slightly as ink spreads marginally in the skin over years, which may cause very tight dot clusters to merge somewhat. However, well-executed dotwork with appropriate dot spacing ages gracefully — the overall tonal composition remains readable even as individual dots lose some precision. Fine spacing dotwork fades more than bold spacing.
Is hand-poke dotwork better than machine dotwork?
Neither is objectively superior — they produce somewhat different aesthetic results and suit different artists' workflows. Hand-poke dotwork tends to create a softer, slightly more irregular texture that many collectors find appealing. Machine dotwork is faster and more consistent over large areas. Your choice should be based on the specific artist's portfolio quality, not technique dogma.
Can dotwork cover up old tattoos effectively?
Dotwork is less effective as a cover-up method than solid blackwork or bold traditional tattooing because its lighter fill density does not always fully obscure dark old ink. It works best for covering faded, lighter old tattoos. Your artist can assess the old tattoo and advise whether dotwork coverage is realistic for your specific situation.
What are the best subjects for dotwork tattoos?
Geometric mandalas, botanical illustration, insects (moths, beetles), skulls, moon phases, and animal portraits with visible texture are among the best subjects for dotwork. Subjects with clear tonal contrast and interesting texture detail reward the dotwork technique most effectively. Very simple, flat designs may not show enough of dotwork's tonal capabilities to justify the extended session time.

Ready to Design Your Dotwork Tattoo?

Use our AI generator to create custom designs in seconds. Preview, customize, and download — completely free.

How to Use an AI Tattoo Preview Before You Book

MyInk is most useful when the output is treated as a planning reference, not a finished tattoo appointment file. Start with the idea you want to test, choose a style that has a real tattoo tradition behind it, then review whether the design can survive on skin at the size and placement you have in mind.

A strong tattoo preview should have one clear subject, readable contrast, and enough negative space for the design to age. Tiny lettering, hairline detail, crowded symbols, soft watercolor edges, and low-contrast color combinations can look beautiful on screen while becoming hard to read after healing and years of sun exposure.

Placement changes the design. A forearm can carry vertical compositions and readable symbols. Ribs and chest placements need more attention to pain, breathing movement, and body curvature. Fingers, hands, and wrists fade faster because the skin moves, washes, and rubs more often. The preview should help you see those tradeoffs before you pay a deposit.

Use the generator to create directions, then narrow to one or two realistic options. Save the prompt, style, placement, and reference image. That record gives your artist a clearer starting point than a folder of unrelated screenshots and helps prevent last-minute design confusion at the consultation.

An artist still needs to redraw, resize, and adapt the concept. Tattooing is not the same as printing an image on skin. Line weight, stencil clarity, needle grouping, skin tone, body movement, and healing all affect the final result. Treat any AI image as a brief for discussion, not a file to copy without judgment.

Be especially careful with memorial, cultural, religious, medical, or partner-name tattoo ideas. Those designs carry meaning beyond aesthetics, so the right workflow includes a pause: check the spelling, symbolism, cultural context, and long-term emotional fit before turning a preview into a permanent mark.

If a page only gives you a pretty image, it has not answered the important question. A useful tattoo planning page should explain who the idea suits, where it works, what might age poorly, what to ask an artist, and when a safer variation would be smarter.

Before booking, compare the design at phone size, full screen, and roughly the real size on your body. If the main shape disappears when small, simplify it. If the design relies on fragile detail, make it larger or choose a bolder style. If the meaning feels unclear, revise the concept before you involve an artist.

Best fit

Early tattoo ideation, style comparison, placement preview, cover-up exploration, memorial concept drafting, and preparing a clearer brief for an artist.

Poor fit

Copying another artist's work, replacing professional stencil preparation, guessing cultural meaning, or choosing a permanent tattoo from a single unreviewed image.

Before using

Check meaning, size, placement, contrast, aging risk, spelling, artist feasibility, and whether the design still feels right after a short waiting period.

Tattoo Planning Checklist

Decide the role of the tattoo first. A decorative piece can be judged by visual strength, fit, and longevity. A memorial or symbolic piece needs a second layer of review: spelling, dates, cultural meaning, emotional timing, and whether the symbol will still feel right when the current life moment has changed.

Check the design at real size. A beautiful full-screen image can fail when reduced to a three-inch wrist tattoo. If the subject, lettering, or secondary symbols become hard to read at actual size, the concept needs fewer details, heavier line weight, more open spacing, or a larger placement.

Compare the style with the body area. Traditional, blackwork, and neo-traditional designs usually tolerate aging better because they use stronger outlines and contrast. Fine-line, watercolor, and tiny geometric pieces can be excellent, but they need careful artist selection, realistic sizing, and acceptance that touch-ups may be part of ownership.

If you are planning a cover-up, be even more conservative. A cover-up has to solve the old tattoo's darkness, shape, and location before it can become a new design. The AI preview can help explore directions, but a cover-up artist must judge what is possible on the existing skin.

Use try-on previews to test placement honestly. Rotate, scale, and compare the idea on the intended body part. A design that looks balanced on a flat screen may distort around elbows, ribs, wrists, shoulders, knees, or fingers. The goal is not a perfect simulation; the goal is catching obvious placement mistakes early.

Before sending anything to an artist, write a short brief: subject, style, placement, approximate size, meaning, colors to use or avoid, and any symbols that must stay out. Add one or two generated references, not twenty. A tight brief gives the artist space to create original work while preserving your intent.

Avoid treating a generated image as proof that a tattoo is safe, culturally appropriate, or technically ready. Ask a professional about stencil clarity, line weight, skin tone, placement movement, and healing. The better the AI-assisted planning, the easier that expert conversation becomes.

If the design still feels right after a short waiting period, the next step is a real consultation. If it stops feeling right, that is a useful result too. The safest tattoo planning workflow helps you avoid weak ideas as much as it helps you find strong ones.

What Makes a Preview Useful

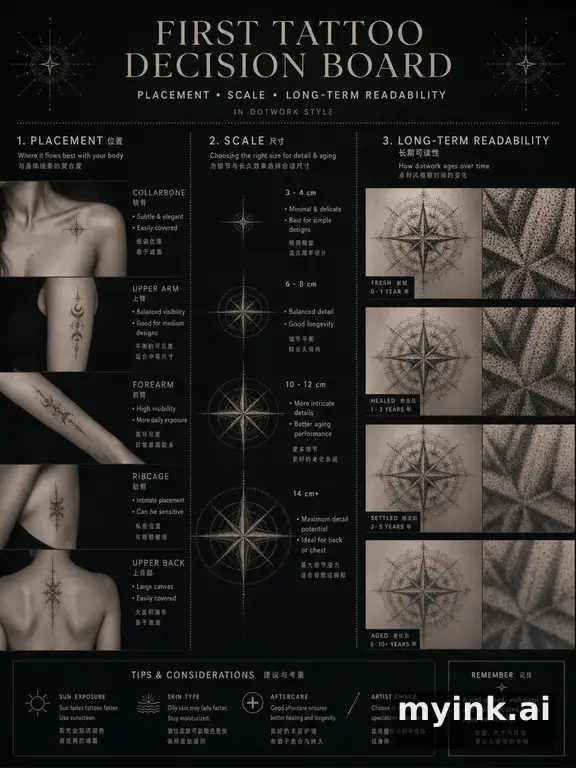
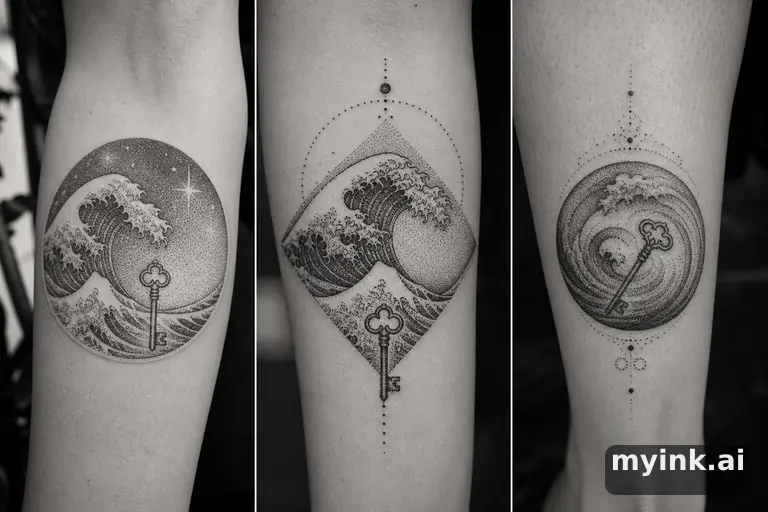
A useful preview answers a specific decision question. On an aging page, the question is whether contrast and line weight will survive. On a meaning page, the question is whether the symbol says the right thing without becoming too crowded. On a cover-up page, the question is whether the new design can realistically hide the old shape. On a pack page, the question is whether the concept is ready for an artist handoff.

The best pages therefore combine image exploration with judgment. They explain what the design is good for, where it may fail, what to ask an artist, and which details should be simplified before the tattoo becomes permanent. This is the difference between browsing tattoo images and actually preparing for a safer appointment.

If the output feels close, do not keep generating randomly. Change one variable at a time: style, placement, size, subject, color, or amount of detail. Comparing focused variations helps you see which part of the idea is strong and which part is creating risk.

A tattoo preview should also make refusal easier. If the design looks wrong on the body, feels too tied to a temporary emotion, depends on detail that will not age, or needs a placement you are not comfortable wearing, stop there. Avoiding the wrong tattoo is a successful planning outcome.

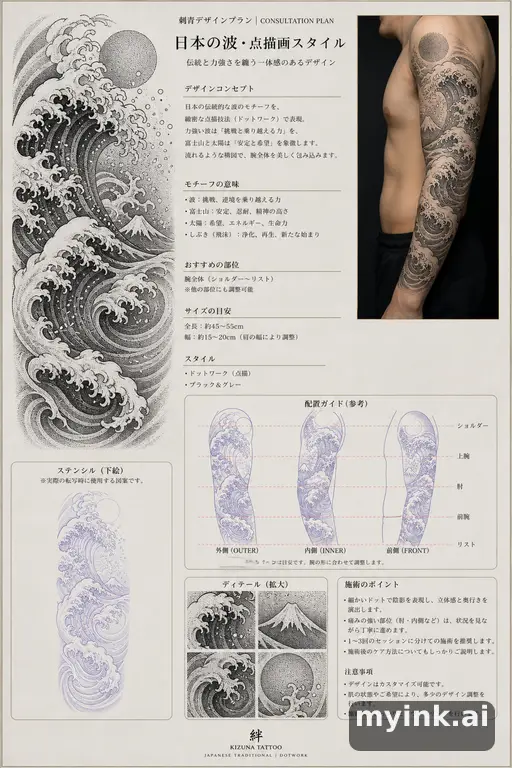
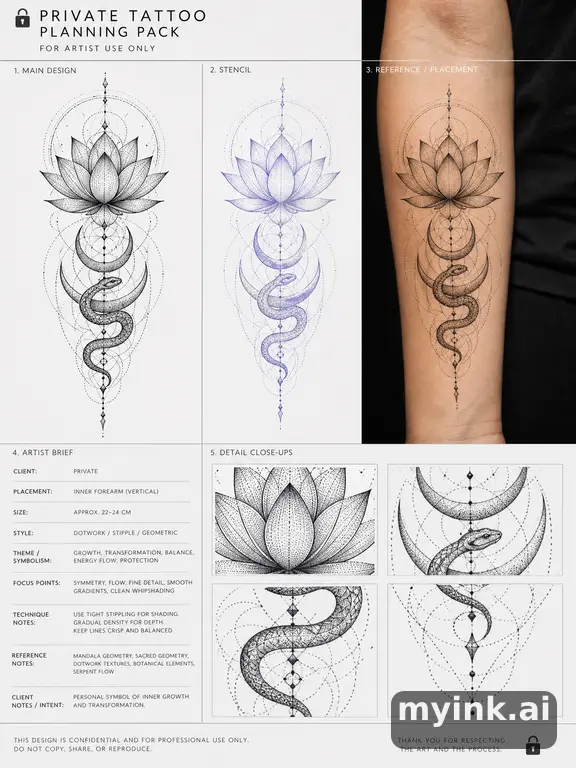
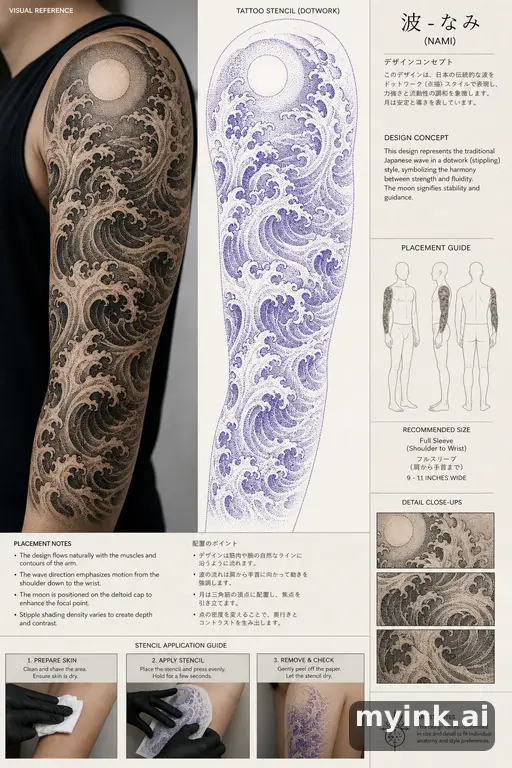
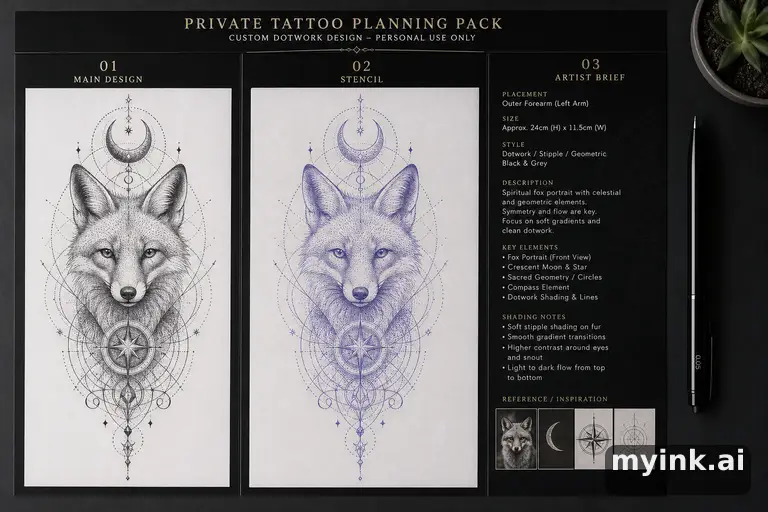
Pack and sample pages should be judged by handoff quality. A useful pack explains the concept, shows the intended style, gives the artist enough context, and leaves room for the artist to redraw instead of forcing a copied AI image. If the handoff would confuse a professional, the design is not ready yet.

Guide pages should help with the questions that sit around the image: what to prepare before a first tattoo, how to think about aftercare, when numbing cream needs artist approval, and how to avoid using pain or urgency as the only decision filter.

Sample pack pages should be especially concrete. They need to show what the buyer receives, how the files support an appointment, what still needs artist review, and when a user should keep refining before purchasing a handoff pack.

When a page helps someone ask a better question before the needle touches skin, it has done real work for both searchers and future clients.

That is why the planning pages emphasize clear briefs, readable designs, realistic sizing, and artist review instead of treating image generation as the final step.

If a sample cannot explain that handoff clearly, it should be revised before purchase.

Clear handoffs reduce appointment friction.

They also reduce revision waste later.